Sharing your photos through the web with ease
So you’ve been to your child’s program in school and ended up taking more than 50 photos using your digital camera. How do you share these to your friends/family without spending a long time uploading them on the web? Let me give you a few tips!
Let me show you how I share my photos on the web with ease —
1. Take photos using the appropriate camera resolution setting. Even for a non-camera enthusiast, one should know what camera resolution means. Digital cameras sold today boast to have maximum resolutions sizes of 3, 5 or even 10megapixels. But did you know that to have a photo seen on the web, you only need your camera setting at 1 megapixel when you take photos? Furthermore, to have high quality print photos at 4R size (4″x6″), you only need a 2 megapixel setting on your camera?
Below is a quick reference chart to give you an idea on what camera resolution would be ideal on the output size you want.
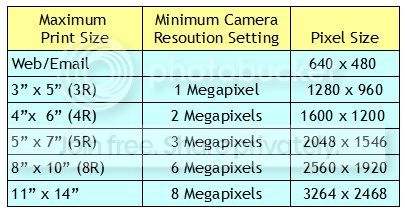
So, if you only plan to share the photos on the web, then you may just set the camera resolution to 1 megapixel. However, if you think that you might need to make a 4″x6″ print photo, then set your camera resolution to 2 megapixels when taking your photo. Do not set it lower than what’s ought to be or else you’ll be enlarging the photo, lose the fine details and end up with a pixelated print.
My camera can take photos of up to 10 megapixels, but this resolution has actually no use for me. By default, my camera is set to 3 megapixels. That way I can have the option to resize the photo for web sharing or print up to 5″x7″.
2. Choose the photos that you will share. Before clicking the share button, you might want to select only the good pictures for sharing. Sometimes I see photo albums shared that has more than 50 photos only to see that there are many duplicate-like shots… you know, how you take a photo of someone then you take another one as a “safety shot”. It’s really more enjoyable to look at photo albums (digital or print) where the photos are carefully selected.
3. Resize your photos. Okay, so you’ve finally reduced the number of photos to 25. If all these 25 photos were taken in high resolution and you just want to share it on the web, then it will take you quite a while to upload it. This is because high resolution photos have big file sizes and the bigger the size, the longer the data transfer will be.
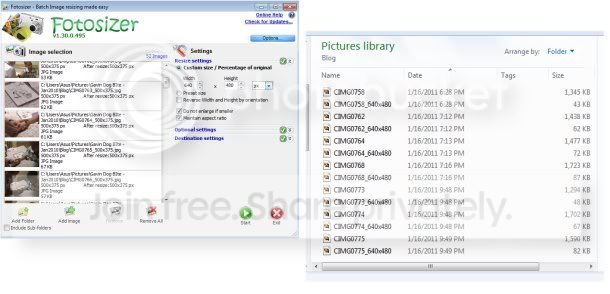
If I’m to share a group of photos on the web, I don’t resize the photos one at at time. I resize it by batch using a freeware program called Fotosizer. After I’ve selected the photos I want to share, I place it in specific folder then run it in Fotosizer. It then makes a copy of the photo in the specified size (my usual size is 640pixels width) and saves it in the same folder. It’s that easy! In less than a minute, I’ve a set of my photos in a smaller size and now ready to be shared on the web.
4. Upload with ease. Now that the photos have been reduced, the file sizes have become smaller. Whether you email the photos or upload it to your favorite photo-sharing website, the transfer will definitely by much quicker.
If you take these steps in mind, the recipients of your photo albums will appreciate your photos more (especially if it’s emailed to them).
Happy sharing!!